
Friday, October 15, 2010
This track is so so good
Read full review of Night Air (Ramadanman Mix) - Jamie Woon / Ramadanman on Boomkat.com ©
Wednesday, August 11, 2010
Cosmic Collidescope Needs Help!!!
As stated above, if you can afford to make a donation to allow us to finish a few final projects before the burn, we will be indebted to you for eternity. Thank you so much!
Wednesday, April 14, 2010
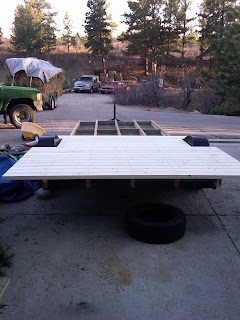
Half decked!
Thanks, again, to Joe at Centennial Wood here in Denver, I found just what I was looking for for the next step in my project - 6/4 pine tongue and groove decking. The stuff is light too, just 278 pounds or 126 kilos for the entire deck! Matt and I got half of it installed and the rest will go on in the morning! Below are some pics! In one, you can see the fiberglass batting in the joists under the flooring. After talking to a friend in the shop that has lot's of experience with pine flooring in log cabins, I decided to install the floors upside down which exposes the v-tongue which is more commonly face down. Apparently, the flat edges are never flush on pine flooring and even if you sand them flat, the edges become misaligned as the wood contracts. The V's make minor height differences between planks negligible. The only drawback to this orientation? The grooves are going to get filled with playa dust but nothing a vacuum and some elbow grease can't fix.

 I am very pleased with the floor space I'm going to have. Though, as I look at the proportions, I will be constructing exterior storage compartments underneath the decking, outside the frame rails in front of and behind the wheel wells. Not only will they be ultra utilitarian but they'll help drop the profile of the trailer.
Also, Jeffrey and I brainstormed a design change today. He has been consistently pushing the idea of a lower bunk below the top bunk. Until now, I've had that space reserved for clothes drawers. It dawned on me, why not both? The width of the raised bed will be approximately 5' and slightly more than 8' long, due to the increased width at the midpoint of the bow-shaped shell. The space under the raised bed will be 8' x 5' at the floor, increasing slightly as it goes up (obviously). I only really need 2' of depth for clothes drawers, so I'll be constructing the drawers 2 feet deep and and 5 feet wide flush with the front of the raised bed section. This will leave a space 3' x 8' wide behind the chest of drawers and a 3' opening to the right of the drawers. It will be a super cool cubby to crawl into! Hard to envision; I'll draft it when I get a chance.
Gotta go!
Sunday, April 4, 2010
Sub-floor Done!
Early yesterday I went to Lowes and got the redwood and hardware for the sub-floor. I started by laying out the 16 footers that run the length of the trailer. I also bought five 8 footers that were to run the width of the trailer underneath the steel chassis. It was how I planned to accomplish the width I wanted for the sub-floor out past the side rails of the trailer. While I was hard at work, my dad and younger brother were working on re-building an ATV motor. Out of curiosity, my dad came poking about my project. I could tell he was impressed and started getting excited about the project. As I started running through the design, layout and build sequence my dad, a builder of 40 years, came up with a whole host of suggestions.
Firstly, I wasn't going to need the horizontal redwood planks to achieve the width I wanted. So long as I use an 1 1/2" tongue and groove (which is rated structural) on the floors, I can cantilever them out over my last joist to achieve my width. Together we sketched a design detail on how to cap the end of the t&g. This suggestion alone saved me the weight of five 8' 2x4's, the labor to install them, 3.5" of ground clearance, a hell of a lot of sealing (all of these 2x4's in the undercarriage would have needed a durable, water-proof finish) and $60 in materials.
Secondly, I intended to run strips of 1/4" plywood between the joists to lay my fiberglass on. These would have needed to be sealed from underneath and the bottoms of the 16 foot 2x4's would have needed sealing as well. Furthermore, being as there was a 5/8" different in height between the tops of the 4" C-Channel and the 3" cross-members, I intended to cut mortises (by hand) in the bottom of the 2x4's wherever they crossed 4" channel, that way they all sat flat against the frame and level.
My dad suggested that instead of notching the 2x4's, I should just run spacers wherever the 2x4's rest on low-spots in the chassis rails. We measured the difference - 5/8". Low and behold my dad had a sheet of 5/8" OSB in the shop, so I through the width gauge on the circ. saw and ripped a bunch of 1.5" wide furring strips, and adhered them to the frame.
Furthermore, instead of using a thin plywood that would need sealing and leaving the bottoms of my joists exposed to the road, he suggested I apply a thin, heavy-duty, water-proof material to the trailer before placing the joists. We crawled under the fifth wheel travel trailer (which you can see in the background of the pic below) and sure enough, it was dried in with felt tar paper, like used for roofing. So I ran to Home Desperate and got a roll of tar paper for $17. This suggestion saved me a boatload of money, better sealed the bottom of my chassis and weighs considerably less than the plywood would have.

In the pic above you can see half of the tar paper in place and the OSB furring strips underneath the 2x4's in the right of the photo.

In the above pic, we have all of the tar paper rolled out and the 2x4 joists in place. We then drilled a bunch of holes, first 1" openings about an 1" deep to countersink the lag bolts then 3/8" holes the rest of the way through the joists, furring strips and into the frame channel below. Jeffrey then crawled around under the trailer, affixing the nuts and washers and wrenching them while I ratcheted them tight from above. Below is an above shot of the countersunk holes with hardware in place.
.jpg)
With the tar paper and joists in place, I crawled under the trailer and fastened furring strips to the bottoms of the joists between the frame rails to help hold the tar paper up. Below is a picture from under the trailer. All of these furring strips will need to be sealed. I'll probably use a roll on chassis liner, which will also add durability to the tar paper.

Up next, I need to roll fiberglass batting into the floor joists for insulation and run my t&g flooring over top. Because I have some leftover tar paper, I'll probably use another layer of it over the glass before the floors go down.
My dad also gave me some good suggestions for my interior walls and a plan of attack for leaving my mahogany t&g exposed on the sides of the vardo but I'll cover those when I get to them.
It's coming right along!
Friday, April 2, 2010
Trailer Paint Done!

I forgot to mention, I also cut off the fender steps to allow clearance for the new sub floor I designed which will give me an extra 20" width at the floor where I need it. The new design should allow me to incorporate a small shower enclosure without changing the exterior aesthetics at all. Exciting stuff!
Wednesday, March 31, 2010
Trailer Mods Done
Well, I got the trailer modifications done today. The next time I have a project that involves cutting a lot of heavy steel, I'm going to buy a heavy duty chop saw. I only needed to make 12 or so cuts but doing it with a portable band-saw, pneumatic cut-off wheel and grinder was time-consuming! I saved the toughest part for last, the widened section at the front of the trailer which involved several miter cuts and some crucial welding as the bunk will sit above this section.
It turned out great! All of the welding is done and paint will go on the chassis this week which means I can start framing the sub-floor as early as this weekend! I also found an RV salvage yard in Westminster; I'm going to try to get over there this week and look for a small shower enclosure, commode, holding tanking, plumbing, sink and other amenities. I'll keep you posted!

It turned out great! All of the welding is done and paint will go on the chassis this week which means I can start framing the sub-floor as early as this weekend! I also found an RV salvage yard in Westminster; I'm going to try to get over there this week and look for a small shower enclosure, commode, holding tanking, plumbing, sink and other amenities. I'll keep you posted!

Tuesday, March 30, 2010
Metalworking Carpenter
I stopped by K & K Surplus, a metal salvage yard my friend Tom suggested, this morning. I found the 3" & 4" steel channel (new) I needed for the trailer modifications and also scored twelve used 8' pieces of 1" conduit that will be used for the strut ends of our bamboo geodesic dome.
After tracking down higher density blades for the portable band-saw and a heavy duty wire wheel for the angle grinder, we set to work. I was lucky to have the help of my younger brother, Jeff. He, like me, can't wait to get the chassis done so we can move on to the carpentry work.

We got three of the four cross-members cut, fitted and welded in place. We also cut out the rear most v-shaped cross-member but chose to leave the one at the front as it has heavy duty angle braces that strengthen the whole front end of the trailer. Also, the lower sitting rail may come in handy when it comes time to mount fresh, grey and black water storage tanks. By the way, I've decided to frame in a small lavatory and install an RV style commode.
Tomorrow, we hope to install the last cross-member, cut out the remaining v-shaped rail and frame up the widened section at the front. I've also been considering a redesign of the sub-floor framing that will lower the overall profile of the caravan and and snug the wheel well in as well. Hard to explain, I'll post drafts when I get them.
Also, I've got all of the stiles and rails for the four section panel doors cut out but I forgot to take pics. I also picked up a bunch of African Mahogany for the tongue and groove walls and eave sections. It really is going to be beautiful. I keep picturing the gas and candle light from Sarah-Leith's beautiful lanterns dancing on the oil-finished mahogany paneling.
Going to bed. Updates soon.
Subscribe to:
Posts (Atom)