
Friday, October 15, 2010
This track is so so good
Read full review of Night Air (Ramadanman Mix) - Jamie Woon / Ramadanman on Boomkat.com ©
Wednesday, August 11, 2010
Cosmic Collidescope Needs Help!!!
As stated above, if you can afford to make a donation to allow us to finish a few final projects before the burn, we will be indebted to you for eternity. Thank you so much!
Wednesday, April 14, 2010
Half decked!
Thanks, again, to Joe at Centennial Wood here in Denver, I found just what I was looking for for the next step in my project - 6/4 pine tongue and groove decking. The stuff is light too, just 278 pounds or 126 kilos for the entire deck! Matt and I got half of it installed and the rest will go on in the morning! Below are some pics! In one, you can see the fiberglass batting in the joists under the flooring. After talking to a friend in the shop that has lot's of experience with pine flooring in log cabins, I decided to install the floors upside down which exposes the v-tongue which is more commonly face down. Apparently, the flat edges are never flush on pine flooring and even if you sand them flat, the edges become misaligned as the wood contracts. The V's make minor height differences between planks negligible. The only drawback to this orientation? The grooves are going to get filled with playa dust but nothing a vacuum and some elbow grease can't fix.
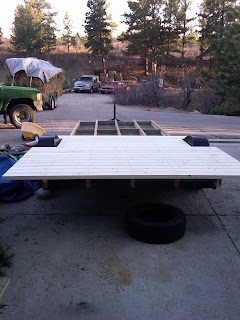

 I am very pleased with the floor space I'm going to have. Though, as I look at the proportions, I will be constructing exterior storage compartments underneath the decking, outside the frame rails in front of and behind the wheel wells. Not only will they be ultra utilitarian but they'll help drop the profile of the trailer.
Also, Jeffrey and I brainstormed a design change today. He has been consistently pushing the idea of a lower bunk below the top bunk. Until now, I've had that space reserved for clothes drawers. It dawned on me, why not both? The width of the raised bed will be approximately 5' and slightly more than 8' long, due to the increased width at the midpoint of the bow-shaped shell. The space under the raised bed will be 8' x 5' at the floor, increasing slightly as it goes up (obviously). I only really need 2' of depth for clothes drawers, so I'll be constructing the drawers 2 feet deep and and 5 feet wide flush with the front of the raised bed section. This will leave a space 3' x 8' wide behind the chest of drawers and a 3' opening to the right of the drawers. It will be a super cool cubby to crawl into! Hard to envision; I'll draft it when I get a chance.
Gotta go!
Sunday, April 4, 2010
Sub-floor Done!
Early yesterday I went to Lowes and got the redwood and hardware for the sub-floor. I started by laying out the 16 footers that run the length of the trailer. I also bought five 8 footers that were to run the width of the trailer underneath the steel chassis. It was how I planned to accomplish the width I wanted for the sub-floor out past the side rails of the trailer. While I was hard at work, my dad and younger brother were working on re-building an ATV motor. Out of curiosity, my dad came poking about my project. I could tell he was impressed and started getting excited about the project. As I started running through the design, layout and build sequence my dad, a builder of 40 years, came up with a whole host of suggestions.
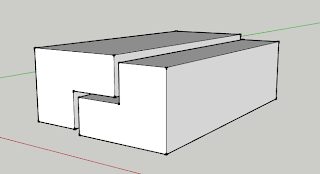
Firstly, I wasn't going to need the horizontal redwood planks to achieve the width I wanted. So long as I use an 1 1/2" tongue and groove (which is rated structural) on the floors, I can cantilever them out over my last joist to achieve my width. Together we sketched a design detail on how to cap the end of the t&g. This suggestion alone saved me the weight of five 8' 2x4's, the labor to install them, 3.5" of ground clearance, a hell of a lot of sealing (all of these 2x4's in the undercarriage would have needed a durable, water-proof finish) and $60 in materials.
Secondly, I intended to run strips of 1/4" plywood between the joists to lay my fiberglass on. These would have needed to be sealed from underneath and the bottoms of the 16 foot 2x4's would have needed sealing as well. Furthermore, being as there was a 5/8" different in height between the tops of the 4" C-Channel and the 3" cross-members, I intended to cut mortises (by hand) in the bottom of the 2x4's wherever they crossed 4" channel, that way they all sat flat against the frame and level.
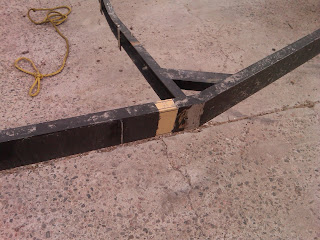
My dad suggested that instead of notching the 2x4's, I should just run spacers wherever the 2x4's rest on low-spots in the chassis rails. We measured the difference - 5/8". Low and behold my dad had a sheet of 5/8" OSB in the shop, so I through the width gauge on the circ. saw and ripped a bunch of 1.5" wide furring strips, and adhered them to the frame.
Furthermore, instead of using a thin plywood that would need sealing and leaving the bottoms of my joists exposed to the road, he suggested I apply a thin, heavy-duty, water-proof material to the trailer before placing the joists. We crawled under the fifth wheel travel trailer (which you can see in the background of the pic below) and sure enough, it was dried in with felt tar paper, like used for roofing. So I ran to Home Desperate and got a roll of tar paper for $17. This suggestion saved me a boatload of money, better sealed the bottom of my chassis and weighs considerably less than the plywood would have.

In the pic above you can see half of the tar paper in place and the OSB furring strips underneath the 2x4's in the right of the photo.

In the above pic, we have all of the tar paper rolled out and the 2x4 joists in place. We then drilled a bunch of holes, first 1" openings about an 1" deep to countersink the lag bolts then 3/8" holes the rest of the way through the joists, furring strips and into the frame channel below. Jeffrey then crawled around under the trailer, affixing the nuts and washers and wrenching them while I ratcheted them tight from above. Below is an above shot of the countersunk holes with hardware in place.
.jpg)
With the tar paper and joists in place, I crawled under the trailer and fastened furring strips to the bottoms of the joists between the frame rails to help hold the tar paper up. Below is a picture from under the trailer. All of these furring strips will need to be sealed. I'll probably use a roll on chassis liner, which will also add durability to the tar paper.

Up next, I need to roll fiberglass batting into the floor joists for insulation and run my t&g flooring over top. Because I have some leftover tar paper, I'll probably use another layer of it over the glass before the floors go down.
My dad also gave me some good suggestions for my interior walls and a plan of attack for leaving my mahogany t&g exposed on the sides of the vardo but I'll cover those when I get to them.
It's coming right along!
Firstly, I wasn't going to need the horizontal redwood planks to achieve the width I wanted. So long as I use an 1 1/2" tongue and groove (which is rated structural) on the floors, I can cantilever them out over my last joist to achieve my width. Together we sketched a design detail on how to cap the end of the t&g. This suggestion alone saved me the weight of five 8' 2x4's, the labor to install them, 3.5" of ground clearance, a hell of a lot of sealing (all of these 2x4's in the undercarriage would have needed a durable, water-proof finish) and $60 in materials.
Secondly, I intended to run strips of 1/4" plywood between the joists to lay my fiberglass on. These would have needed to be sealed from underneath and the bottoms of the 16 foot 2x4's would have needed sealing as well. Furthermore, being as there was a 5/8" different in height between the tops of the 4" C-Channel and the 3" cross-members, I intended to cut mortises (by hand) in the bottom of the 2x4's wherever they crossed 4" channel, that way they all sat flat against the frame and level.
My dad suggested that instead of notching the 2x4's, I should just run spacers wherever the 2x4's rest on low-spots in the chassis rails. We measured the difference - 5/8". Low and behold my dad had a sheet of 5/8" OSB in the shop, so I through the width gauge on the circ. saw and ripped a bunch of 1.5" wide furring strips, and adhered them to the frame.
Furthermore, instead of using a thin plywood that would need sealing and leaving the bottoms of my joists exposed to the road, he suggested I apply a thin, heavy-duty, water-proof material to the trailer before placing the joists. We crawled under the fifth wheel travel trailer (which you can see in the background of the pic below) and sure enough, it was dried in with felt tar paper, like used for roofing. So I ran to Home Desperate and got a roll of tar paper for $17. This suggestion saved me a boatload of money, better sealed the bottom of my chassis and weighs considerably less than the plywood would have.

In the pic above you can see half of the tar paper in place and the OSB furring strips underneath the 2x4's in the right of the photo.

In the above pic, we have all of the tar paper rolled out and the 2x4 joists in place. We then drilled a bunch of holes, first 1" openings about an 1" deep to countersink the lag bolts then 3/8" holes the rest of the way through the joists, furring strips and into the frame channel below. Jeffrey then crawled around under the trailer, affixing the nuts and washers and wrenching them while I ratcheted them tight from above. Below is an above shot of the countersunk holes with hardware in place.
.jpg)
With the tar paper and joists in place, I crawled under the trailer and fastened furring strips to the bottoms of the joists between the frame rails to help hold the tar paper up. Below is a picture from under the trailer. All of these furring strips will need to be sealed. I'll probably use a roll on chassis liner, which will also add durability to the tar paper.

Up next, I need to roll fiberglass batting into the floor joists for insulation and run my t&g flooring over top. Because I have some leftover tar paper, I'll probably use another layer of it over the glass before the floors go down.
My dad also gave me some good suggestions for my interior walls and a plan of attack for leaving my mahogany t&g exposed on the sides of the vardo but I'll cover those when I get to them.
It's coming right along!
Friday, April 2, 2010
Trailer Paint Done!

I forgot to mention, I also cut off the fender steps to allow clearance for the new sub floor I designed which will give me an extra 20" width at the floor where I need it. The new design should allow me to incorporate a small shower enclosure without changing the exterior aesthetics at all. Exciting stuff!
Wednesday, March 31, 2010
Trailer Mods Done
Well, I got the trailer modifications done today. The next time I have a project that involves cutting a lot of heavy steel, I'm going to buy a heavy duty chop saw. I only needed to make 12 or so cuts but doing it with a portable band-saw, pneumatic cut-off wheel and grinder was time-consuming! I saved the toughest part for last, the widened section at the front of the trailer which involved several miter cuts and some crucial welding as the bunk will sit above this section.
It turned out great! All of the welding is done and paint will go on the chassis this week which means I can start framing the sub-floor as early as this weekend! I also found an RV salvage yard in Westminster; I'm going to try to get over there this week and look for a small shower enclosure, commode, holding tanking, plumbing, sink and other amenities. I'll keep you posted!

It turned out great! All of the welding is done and paint will go on the chassis this week which means I can start framing the sub-floor as early as this weekend! I also found an RV salvage yard in Westminster; I'm going to try to get over there this week and look for a small shower enclosure, commode, holding tanking, plumbing, sink and other amenities. I'll keep you posted!

Tuesday, March 30, 2010
Metalworking Carpenter
I stopped by K & K Surplus, a metal salvage yard my friend Tom suggested, this morning. I found the 3" & 4" steel channel (new) I needed for the trailer modifications and also scored twelve used 8' pieces of 1" conduit that will be used for the strut ends of our bamboo geodesic dome.
After tracking down higher density blades for the portable band-saw and a heavy duty wire wheel for the angle grinder, we set to work. I was lucky to have the help of my younger brother, Jeff. He, like me, can't wait to get the chassis done so we can move on to the carpentry work.

We got three of the four cross-members cut, fitted and welded in place. We also cut out the rear most v-shaped cross-member but chose to leave the one at the front as it has heavy duty angle braces that strengthen the whole front end of the trailer. Also, the lower sitting rail may come in handy when it comes time to mount fresh, grey and black water storage tanks. By the way, I've decided to frame in a small lavatory and install an RV style commode.
Tomorrow, we hope to install the last cross-member, cut out the remaining v-shaped rail and frame up the widened section at the front. I've also been considering a redesign of the sub-floor framing that will lower the overall profile of the caravan and and snug the wheel well in as well. Hard to explain, I'll post drafts when I get them.
Also, I've got all of the stiles and rails for the four section panel doors cut out but I forgot to take pics. I also picked up a bunch of African Mahogany for the tongue and groove walls and eave sections. It really is going to be beautiful. I keep picturing the gas and candle light from Sarah-Leith's beautiful lanterns dancing on the oil-finished mahogany paneling.
Going to bed. Updates soon.
Thursday, March 25, 2010
Weather Delay
Well today may be my only chance to work on the vardo for a while but this happened on Tuesday -
The forecast says it will be 51 degrees or 11 Fahrenheit today which means it'd be nice enough to work but uber wet from the melt. I need a place indoors to work on my large scale projects.
Adam and I were at the Habitat for Humanity Outlet on Monday, donating a massive conference table I hauled out of the basement I'm finishing and Adam stumbled on this old, decorative iron fence in the yard.

There are four of these iron designs loose and in good shape. I'm going to pick them up today. The plan is to paint them and use them somewhere on the project, they're perfect for the aesthetic we're trying to achieve. They remind me of the intricacy of the drays old vardos are built on.

Sarah-Leith came up with another appointment for the interior. She'd like to incorporate a couple of antique, silver-gilded and tarnished glass mirror panels. Not only would they be beautiful, they be handy in sorting out playa "looks." I tried to find an example but google returned mostly distributors of faux tarnished mirrors. Some of them look really nice, different than the crap with gold marble-like veins that was mad popular in 70's swank hotels. I stumbled on a couple of instructables on producing your own antiqued mirrors. I may give it a shot, see how it turns out. Otherwise, I may order a few panels from one of the distributors and integrate them into the panel door to the closet, giving us a full length mirror. Plus, a modern glass will better withstand the rigours of highway travel.
Below is a picture of clear-finished African mahogany. Two inch tongue & groove panels of this stuff will make up the panels of the door, the front and back wall and porch eaves.
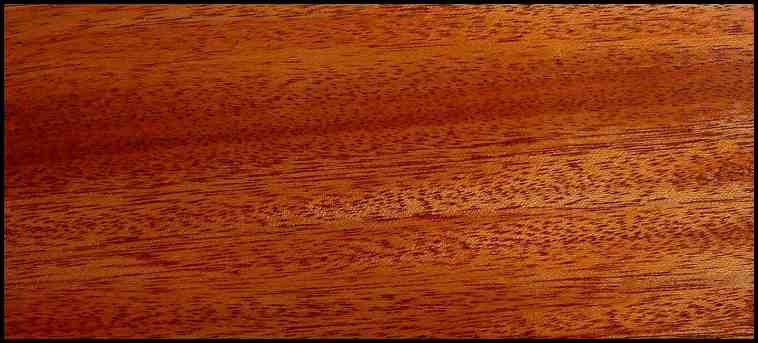
'Twill be luxurious! Also, I forgot to take pics but I started four-squaring the white oak and cutting out the individual stiles and rails for the doors. I've yet to post a pic of my specific door, I'll try to do that soon. There's a picture of a very similar door a couple posts back. That one's a three part door, mine is four. The resident door guru, Neil, wasn't in the shop last night but I talked with Todd who makes his living as a pipe organ restorer and has lots of prior experience in doors. He gave me TONS of good ideas. He showed me joinery for panel doors that can all be cut on the table saw, which will save tons of time and he passed on a design he's used on stable doors in the past that essentially "stacks" the four doors and will allow me to lock the whole setup with one bolt.
 So, the left and right doors meet in the middle, naturally. Likewise, the top two doors and bottom doors meet at about waist level. Where the doors meet, some will overlap the others in the above configuration. The left doors will close over the right doors and the top doors over the bottom doors, which means a single bolt in the top left door will bolt the whole thing closed. When shut, the doors will all look precisely the same size and the 3/4" stop-plate built into the edge of the "under-lapping" doors will make for a great spot to install proper weather-stripping. So the whole door will be air (and dust) tight.
The only problem with Todd's advice? I bought my lumber before talking with him and didn't account for half of my stiles and rails being 3/4" wider. The material I bought would have allowed me to cut the pieces out two-wide but now I'll need to get some more white oak.
That's all for now, more to come!

The forecast says it will be 51 degrees or 11 Fahrenheit today which means it'd be nice enough to work but uber wet from the melt. I need a place indoors to work on my large scale projects.
Adam and I were at the Habitat for Humanity Outlet on Monday, donating a massive conference table I hauled out of the basement I'm finishing and Adam stumbled on this old, decorative iron fence in the yard.

There are four of these iron designs loose and in good shape. I'm going to pick them up today. The plan is to paint them and use them somewhere on the project, they're perfect for the aesthetic we're trying to achieve. They remind me of the intricacy of the drays old vardos are built on.
Sarah-Leith came up with another appointment for the interior. She'd like to incorporate a couple of antique, silver-gilded and tarnished glass mirror panels. Not only would they be beautiful, they be handy in sorting out playa "looks." I tried to find an example but google returned mostly distributors of faux tarnished mirrors. Some of them look really nice, different than the crap with gold marble-like veins that was mad popular in 70's swank hotels. I stumbled on a couple of instructables on producing your own antiqued mirrors. I may give it a shot, see how it turns out. Otherwise, I may order a few panels from one of the distributors and integrate them into the panel door to the closet, giving us a full length mirror. Plus, a modern glass will better withstand the rigours of highway travel.
Below is a picture of clear-finished African mahogany. Two inch tongue & groove panels of this stuff will make up the panels of the door, the front and back wall and porch eaves.
'Twill be luxurious! Also, I forgot to take pics but I started four-squaring the white oak and cutting out the individual stiles and rails for the doors. I've yet to post a pic of my specific door, I'll try to do that soon. There's a picture of a very similar door a couple posts back. That one's a three part door, mine is four. The resident door guru, Neil, wasn't in the shop last night but I talked with Todd who makes his living as a pipe organ restorer and has lots of prior experience in doors. He gave me TONS of good ideas. He showed me joinery for panel doors that can all be cut on the table saw, which will save tons of time and he passed on a design he's used on stable doors in the past that essentially "stacks" the four doors and will allow me to lock the whole setup with one bolt.

The only problem with Todd's advice? I bought my lumber before talking with him and didn't account for half of my stiles and rails being 3/4" wider. The material I bought would have allowed me to cut the pieces out two-wide but now I'll need to get some more white oak.
That's all for now, more to come!
Tuesday, March 23, 2010
A quick update


I'm giving mobile blogger a shot, so the layout of this post might be less than ideal.
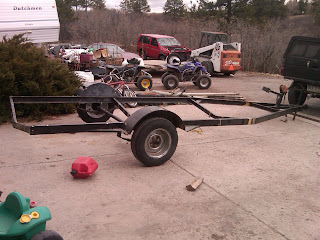
In the 1st pic you'll see the whole trailer sans the boat crapola. I estimate I removed 40 pounds or so, which is half the weight of the redwood sub-floor i'll be installing. Awesome.
The 2nd pic is a shot of the back of the trailer from the side. You can see that the rail is bent back a couple of inches. This is common with boat trailers. When retrieving a boat, they're backed down a ramp empty into the water and the Boat is pulled on to it. When the trailer is pulled forward, the added weight of the boat lowers the clearance of the trailer and can cause the chassis to drag on rocks. Not to worry! All of the v-shaped frame rails will be cut out and replaced with straight and shiny new c-channel steel!
The 3rd is a shot of the tongue. You can see that the passenger side rail is bent toward the center. I don't know that it matters but while I'm at it I plan to straighten it out. Also, I'm going to have to plasma cut or bandsaw the boat winch off of the frame as its been welded in place. Lastly, to clean up the tongue, I'm going to install a new jack and wheel.
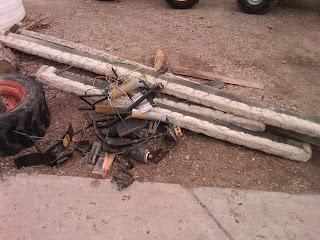
In the 4th, you can see where I cut off the tubular steel hull bumper supports and taillight risers. These will be ground flat to the frame and the back of the fender will be straightened. I plan to find a more inconspicuous spot for the lights. In the 5th shot you can see where I've started to grind stuff flat.
The last photo is of the pile of crap I cut, ground and pried off the frame. I'm hoping to get the welding started this week but I don't know if the weather will cooperate; we're expecting 12" of snow overnight.
I've decided on a paint for the frame though I'm certain the designer and artist in resident won't approve. It's called Chassis Saver, made by Magnetic Paints and it comes in all shades of true black. I used this stuff in the underside of my truck bed and it's BULLET-PROOF so function might win out over form on this one.
I also went to Centennial Wood today and picked up the white oak for the door and decided on African Mahogany for the inside panels of the door as I can get rips of it super cheap, it's amazing for exterior use and will look incredible against the white oak. Unfortunately, I'm going to have to ditch Beetle kill as the exterior panelling, its just terrible for exterior use. I will most likely use the same mahogany which means the exterior will be dark and rich as Sarah-leith first envisioned it. I will, however, still use beetle kill for the interior tongue and groove flooring and the cabinetry.
Well gotta go, more updates soon!
Friday, March 19, 2010
Trailer modification
Just a quick note on the trailer modifications. I need to add width to support the caravan at the front of the trailer. It's either that or make the whole caravan shorter which I'm totally not into. The section behind the tongue, at the front of the trailer will house the back of the caravan where the bunk bed will be. I want to make sure that this section is well supported so I'm going to weld in 4"x1.5" C-Channel like the rest of the trailer is constructed of. I'll also need to add a horizontal rail at the front of the wheel wells. In addition to all that, the existing horizontal rails are not currently flat like in the picture below, they are v-shaped, dropping to a point about 8" down in the centre. I will need to cut these off of the trailer, cut them in half, remove the miters, weld them back together and weld them back into the trailer flat. As soon as I get good weather and don't have to work on a weekend, I'll get this done. From there, I'll remove all soft parts and wiring, sand-blast the entire frame, prime and paint. I need to consult the designer on a colour for the trailer.

Monday, March 15, 2010
Vardo Art & Design
I'm going to post some pics of design themes and elements we plan to implement in our design. Below is the link to a pdf of Sarah-Leith's original mood board for the project. She has already begun collecting candle lanterns and antique milk bottles for exterior lighting.
Mood Board
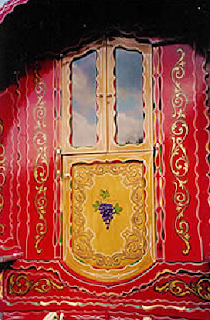
Below is an image of a door that is very similar to the one I am currently designing.
Here is a porch detail and finish aesthetic I like very much. I think with the right colours it could compliment, quite nicely, the blue stain beetle-kill pine I intend to use for the exterior.

I'm considering incorporating a theme similar to the one below into my door. The one below is obviously quite crude but I really like the idea, I just might take it and improve it.

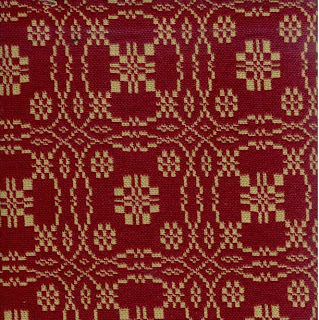
Below is a pic of the interior fabric Sarah-Leith found for the ceiling. It's called "The Lovers Knot" and it is made, I might add, in the US of A.
Here's a pic of a bow-top with a bay window at the front. I intend to install a bay window as well, though I don't envision mine as radial is this one.

Below is a pic of the trailer the vardo will be built on. I just picked it up from Casper, Wyoming yesterday. First on the bill is to adapt the trailer which has, up to this point, lived its life as a boat hauler into one that I can use for the project. Should be simple enough and I'll try to do it by adding as little weight as possible. Once that's done, I'll sandblast the whole thing and give it new paint. From there I can begin constructing the sub-floor of the vardo.

Now that I have the trailer and have taken detailed measurements, I can begin rendering the vardo in SketchUp. From there I can start ordering materials and once the chassis is set-up, can begin constructing the shell.
More to come...
Mood Board
Below is an image of a door that is very similar to the one I am currently designing.

Here is a porch detail and finish aesthetic I like very much. I think with the right colours it could compliment, quite nicely, the blue stain beetle-kill pine I intend to use for the exterior.

I'm considering incorporating a theme similar to the one below into my door. The one below is obviously quite crude but I really like the idea, I just might take it and improve it.

Below is a pic of the interior fabric Sarah-Leith found for the ceiling. It's called "The Lovers Knot" and it is made, I might add, in the US of A.

Here's a pic of a bow-top with a bay window at the front. I intend to install a bay window as well, though I don't envision mine as radial is this one.

Below is a pic of the trailer the vardo will be built on. I just picked it up from Casper, Wyoming yesterday. First on the bill is to adapt the trailer which has, up to this point, lived its life as a boat hauler into one that I can use for the project. Should be simple enough and I'll try to do it by adding as little weight as possible. Once that's done, I'll sandblast the whole thing and give it new paint. From there I can begin constructing the sub-floor of the vardo.

Now that I have the trailer and have taken detailed measurements, I can begin rendering the vardo in SketchUp. From there I can start ordering materials and once the chassis is set-up, can begin constructing the shell.
More to come...
There is something in October sets the gypsy blood astir, We must rise and follow her; When from every hill of flame she calls and calls each vagabond

This blog, which has never been well maintained, has been given a new purpose. I've begun a project that, at the risk of sounding dramatic, may develop into a theme that defines the next chapter in my life. Anyone that sees me routinely, has heard me go on about "the vardo." The vardo is freedom and imagination and romance and storytelling and escape and love; more than all things it is love.
A vardo is a traditional horse-drawn wagon used by English Romani People or 'Gypsies.'More examples of vardos:


The latter two photos are good examples of "bow-top" style vardos, the third photo being that of an "open-lot" vardo which, in the place of a sealed entrance, has an opening and heavy drapes that can be drawn closed. The bow-top is constructed of steam-bent ash strips and straight ash cross-members. The "skeleton" of the wagon is covered with decorative fabric which can be seen from the interior, wool insulation then water-proof canvass on the exterior. Our vardo will be a bow-top of this type though not an open-lot. We will have a sealed entrance as this will be our living quarters on the playa this year and perhaps for years to come.
Our only departures from tradition regard the canvass top and the chassis. Ours will, of course, not be horse-drawn, it will be constructed on a steel, tow-behind, modern trailer chassis which should prove to be much more highway friendly. Regarding the canvass, all traditional vardos seem to be appointed with teal canvass coverings. Neither Sarah-Leith nor I are particularly fond of the colour and because we've found no historical significance for it, we're going to choose one that better suits our tastes.
This blog, in its beginning, will serve as a journal of the design and construction of the vardo. Expect lots of progress pics and technical jargon and the occasional venting of inevitable headaches and speed-bumps. Upon completion, the blog will serve as a travel journal. The latest date set for the vardos maiden voyage is August 20th of this year, when we push off for Black Rock City in advance of the event to set up camp, though I'm hoping to have the raw construction of it done before that. After Burning Man, we are heading to San Francisco to visit friends. We are in need of a place to park the thing for a few days. If you know of anyone in the bay area with a warehouse or yard and wouldn't mind gypsy guests, put me in touch with them.
After San Francisco, tentative plans are to take the coastal highway up to Red Woods National Forest to park the vardo among the oldest trees on earth. After that, is unknown. There are daydreams of staying on the road for a while, travelling from town to town finding carpentry work here and there. I will have all of my tools in the back of the truck after burning man anyhow. So long as I have Sarah-Leith and Lola by my side, I suppose I could travel indefinitely. That is, now, just a daydream but like the vardo itself, daydreams can sometimes become reality.
I dedicate the construction of this vessel to it's queen, my gypsy, my love, Sarah-Leith, whom I love with all of the atoms buzzing inside me. She willed its creation and my love for her will go into each stroke of my saw and pare of my chisel. In its pine and canvass walls I will feel next to her no matter where she is in the world.
I suppose now would be the time to mention that this blog may be a bit sappy at times. Anyone that knows me should have expected that. I hope you enjoy the blog as much as I'm sure to enjoy the build.
With Regards,
Josh
Subscribe to:
Posts (Atom)